Thursday, 29 August 2019

Finally....

Just finished putting some paint on my Bonnedig from my Welsh faction for Saga. Basing will be done once everything else is painted.


Not the prettiest things I've ever painted but they pass the 3' test, and believe it or not it was all done with that single brush.

My new mancave gets erected this weekend so hopefully more hobby time is coming my way, and it'll be nice to have some where to prime figures again. Though it'll be a while before I get the electric sorted.

Thursday, 4 April 2019

Not doing nothing...

...just not doing anything exciting.

Hobby time has been at a premium the last 3 weeks or so, and what time I have spent has been pretty boring.

I magnetized some bases.

I rebased some 15mm Spartans.

And I got some 6mm Visigoths ready for priming.

But most exciting I actually got a game of Saga in. My unpainted Welsh, against Garry's Steppe tribes on a table with no terrain and a rising tide....not ideal for the Welsh. But this was my 1st game of Saga in about 10 years so it was good to have less to think about.
I obviously lost, an obscene set of shooting took my mounted Hearthguard out of the game very early on and with Garry's superior movement and no way for me to counter meant that he could bide his time to strike at the opportune moment. Though I did get off a successful taunt which was nice. Learnt some lessons and am looking forward to getting some more games in.
(And completing the painting of this force.)

Friday, 8 March 2019

Romanes eunt domus!

So last night I decided to put off finishing painting my Welsh Bonnedig unit that's taking far too long to complete by digging out the Early Imperial Roman army that I bought back in the days before there was even any Northern Wasters. ( A gaming group from N. Ireland that liked to travel to Warhammer world for WFB tournaments.)
These had been bought via Wargames Foundry and their "Collections". In fact I remember their packs being £8 for 8 foot or 4 mounted figures, this is now £12, probably still not as good an investment as Lego. (Seriously 80s Lego was a better investment than gold, if you didn't play with it.....)
I had originally built this army for Warhammer Ancient Battles in their 1st incarnation using the sample army from the back of the book as the base. A small part of me regrets selling on all the WAB books that I had, and I had them all, but then I remember how much I sold them for and what I spent the money on so it's not to big a regret, and I probably still wouldn't have any opponents.
My rule set of choice is now Clash of Empires from Great Escape Games and true to their WAB inspired roots the EIR list is presented in the core rulebook, though of course I also posses the 3 source books they also have produced.
So armed with the old school pad of paper, pencil and calculator. (But not that old school as my smart phone stood in for the latter.) And only using figures I already possess I beefed up the small looking units from the WAB list and ended up with the following.

  • General
  • Sub commander on horse
  • 24 Legionaries
  • 20 Legionaries
  • 20 Legionaries
  • 24 Auxilaries
  • 10 Archers
  • 8 Javelinmen 
  • 2 Scorpio
  • 5 Equites Cohort
  • 10 Allied Gallic/German cavalry.
Though if I drop 2 archers and 3 auxilaries I can afford a 2nd sub commander, or one to join the Gallic cavalry.
I would like to pretend I built this army around a battle plan, but those who know me would know I don't play games that way preferring to fit my plans to my armies but I feel this list is pretty solid if a bit light on skirmishers.
Now to get the Ancient Britons out and see what I can come up with for them.
(And virtual cookies for anyone correcting my Latin....)


Tuesday, 5 March 2019

Fixing Ikeas Detolf.

This was originally posted on an older blog of mine.

Ikeas Detolf display cabinets are almost flawless arn't they?  I have looked and found nothing that even compares in that price bracket, but yet flawed they are.  (At least for those of us that want to display wee fighting men.)  Coming with only 3 shelves they do leave a lot of unused space, space that can be filled with more wee fighting men, one very popular method of getting in extra shelves is the cable grip method, this involves buying some 6mm cable clamps and a bit if fiddling, I would also recomend buying the extra shelves a little deeper than the originals if you do go this way.  For those of you unfamilier with this method you can find it here.

Not bad, but it does look like a cheap fix, I wanted something that would look a bit better and after shopping around I discovered I could get 6mm drawn steel rod for not much more than the cable clamps would cost me, so measuring the existing glass supports I bought enough 6mm rod to add 3 extra shelves per case.  (I picked up 2 really cheaply from a place that closed down.)
I only added 3 shelves and did not put an extra shelf in the bottom section, this gave me a larger section for anything big I may end up with.

I cut the rods to the required length.

But forgot to take a picture.

I then decided a simple jig would help position the rods a bit more accurately so constructed one from some spare wood, this would help prevent wobbly shelves.


Then using the jig to position everything welded the rods onto the existing uprights.


Then primed and repainted the frames.


And assembled the cabinet as usual.

No picture yet.
I got the shelves cut at a local glaziers, you can use the dimensions of the original shelves in this case, and I would recomend a pencil grind to finish the edges. 

There we have it, one modified and neat looking Detolf cabinet, next thing would be to add lights.

A place to hide. Part 3.

A post originally found on my Burning my Fingers blog.

While deciding how to do my woods I nearly landed on the idea I am presenting here, I spied it on another gaming blog but unfortunately I don't know which one, and no doubt it is not a wholly original idea.
I haven't actually assembled these just laid them out to show you all an alternative idea.
I started by buying some hexagonal bases from Warbases (Worth checking out anyway.) I think these are 40mm.  Then going back to part one of this tutorial I replaced the washers with the hexagonal bases.
Then it is just a matter of arranging the hex based woods as you see fit on the table top.
Probably a lot simpler than the method I settled on, and far more modular enabling you to make wooded hills and follow rivers etc a bit easier, but maybe not as aesthetically pleasing.


A place to hide. Part 2.

This post first appeared on my blog, Burning my Fingers.

So after getting excited and devouring the new FoW rule book (Also going to Kenya to get married.) I have finished making my woods.
I started by getting some 3mm MDF from a local DIY store and marking out rough areas of the bases and where I want the tree bases to sit on each base, I don't make them too dense as woods are area terrain and true LOS isn't involved, just enough to make the base look like a wooded area.  About 8-9 on each base.
I then router out a 1.5mm deep 26mm recess where I want each tree base to sit.  26mm twin flute router bits are not cheap and you would need a router with a 1/2" collet, I'm just lucky enough to have one available to me.  An alternative would be to use a 26mm hole cutter and gluing 2 piece of MDF together once you have the holes cut, a drill would suffice for this, though you will have thicker bases for your woods.
Or, if you have some skill with a router, making a template and using a smaller bit is also a possibility.
As I am using a 26mm bit which is designed for cutting channels there is a small raised area in the centre of each recess, these are easily chiselled away.
The more astute of you will of already realised I routered out the recesses before cutting the bases out, this makes the sheet of MDF easier to control when you are using a tool trying to spin it around at a rate of knots.  So once I have all the recesses done I cut the bases out (I have a tabletop fret saw, but a jig saw would do just as well.) sand the edges and am ready to proceed.
I found some pre-cut, 25mm, self adhesive, magnetic discs on the Magnetic Displays website, and decided it was worthwhile buying these rather than cutting out my own from some magnetic paper.  It was a simple matter of peeling of the backing and sticking them in the holes, though I decided to spread a bit of contact adhesive in each hole before doing this to improve the chances of them not coming out in the future.
Then once the magnets are in place I can set the trees (Based on steel washers, remember.) into the recesses and not worry about them moving.
I can even tilt the base and the trees stay put.
And when they get in the way they are easily moved.

All I need to do now is finish the bases to match my other terrain.  I have a different method to show you that is more modular in its approach and is really simple, but that will wait for part three.


A place to hide. Part 1.

This post originally appeared on my Flame of War blog, Burning my Fingers.

Woods, gotta love 'em.  A great way of covering your advance, somewhere to spring an ambush from and even something to keep you safer from flying tank killers.  I'm looking at you Typhoons and Hs129B3s.
Pain in the arse to make though, and can turn out costly, but in my constant efforts to build tables on the cheap I've come up with this.
I'm not ashamed to admit that I buy my trees, I found an eBay supplier Everest Model that I get them from.

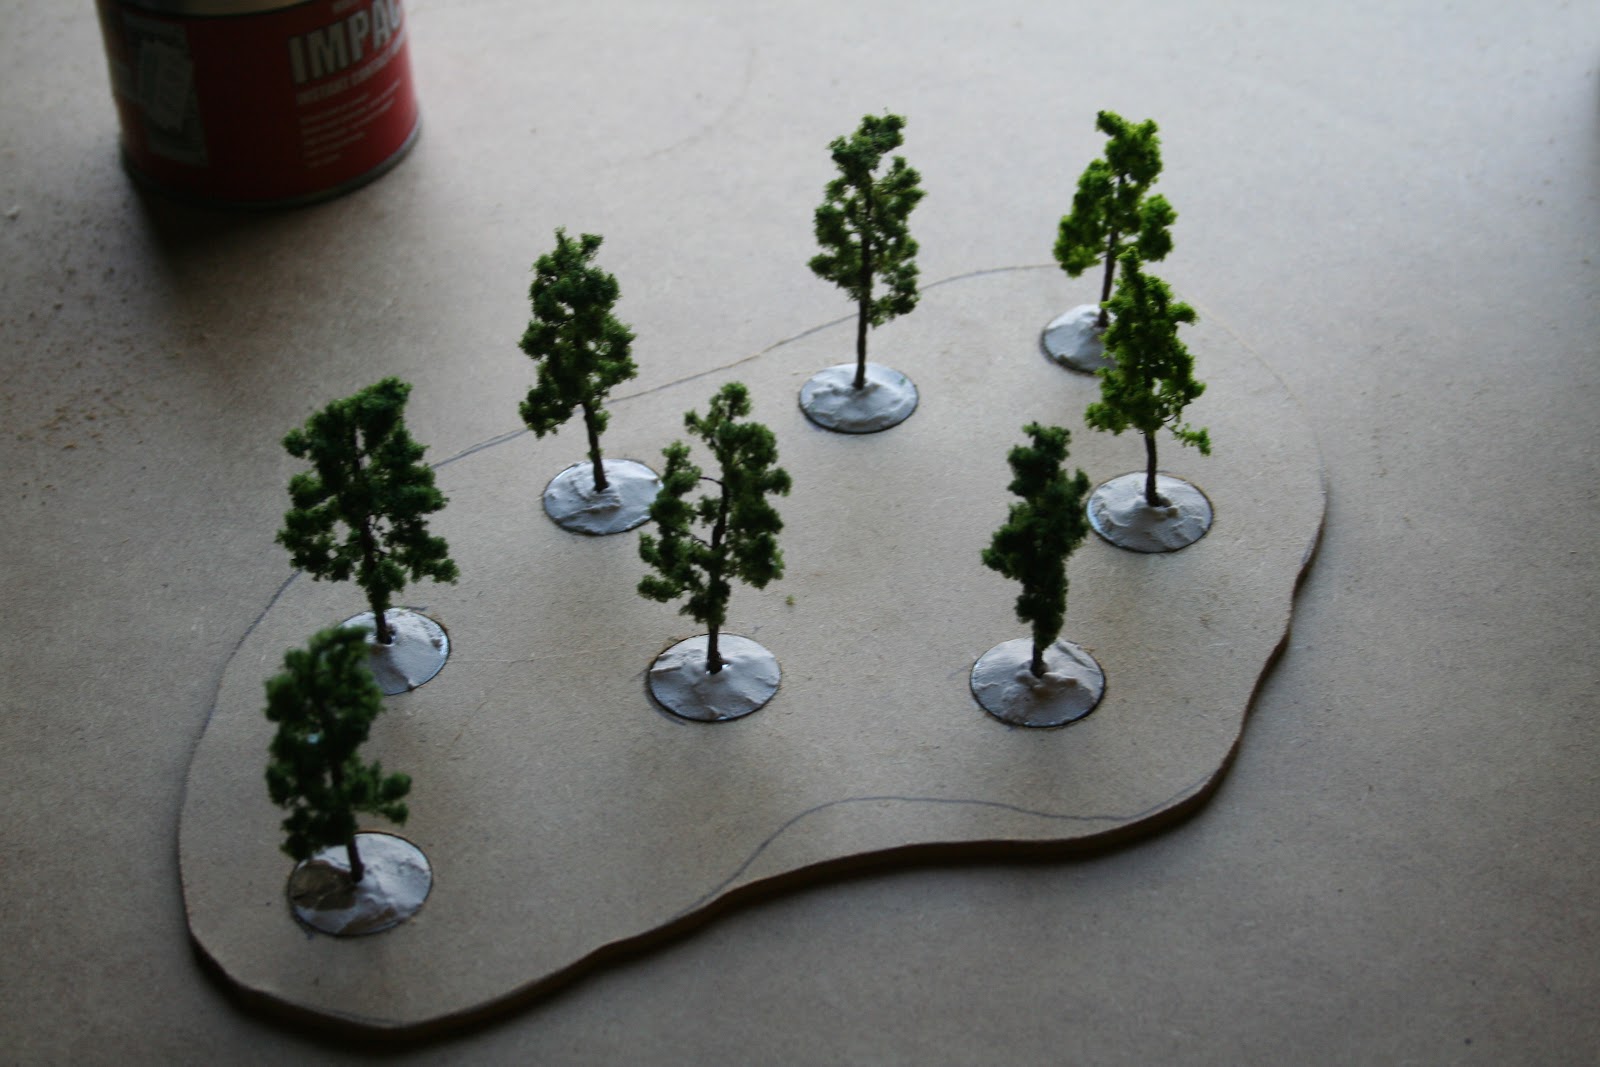
These are 65mm tall and work out at a little over 20pence each, bargain.  He also sells trees in all types of sizes and other small bits and pieces that are on a 'future project' list I carry in my head.  They come un-based though so after a bit of head scratching I went and bought a pack of these.
Small hex nuts, with an internal diameter that will take the trunks of the trees quite snugly, if memory serves me these are M3 in size.
I then glue them onto a 25mm disc, in this case I use washers with as small a hole in as possible, I found them in my local B&Q.  Plastic bases can also do the job but I plan to add some magnetic goodness to my woods so have gone for washers.
Then glue the tree into the washer.
Repeat, until you get bored.
All very well, but the bases don't look too good, to remedy that I go to my local hardware store and buy a tub of this.  (Actually I don't go because it's what I use on my bases, so I had some already.)
And cover the washer and hex nut with some plaster, it may help to add a drop of water, and I mean a drop, too much will just make a mess, I also use a tongue depressor as a spatula and as a spreader, not just for basing hedges.
Again, repeat until bored.  I have stuck a base of Grenadiers and an M10C into the shot so you can get an idea of the size of the trees.
Once the plaster has dried (I leave it overnight.) I'll paint it to match my Infantry bases, a tip here is to paint a layer of watered down (Milk like.) PVA glue onto the plaster before painting, this means the plaster wont soak up as much paint and it'll go a bit further.
So there you have it, 24 trees based, waiting to be painted and awaiting the wood bases that will turn them into area terrain.  That'll be covered in part two.

A place to hide. Part 2.
A place to hide. Part 3.